Saturday, 30 November 2013

Lock, stock and a few smoking paddles...

Finally, I found my little old tin of lock gate stuff.  Just as well, as I need them for the lock element on Lantern Yard.
I made these a long time ago.  They started as you can see, from steamed pear, my favourite wood.  The gates are made exactly as the real ones. I was lucky to see some being made at Tardebigge on the Worcester and Birmingham Canal.
I chose the pattern of lock furniture to be like that I'd seen on the Welsh Canal.  Little riots of the founders' and early machinists' craft.

Brass master patterns were made and a colleague did me some sets of very fine castings of them.  I have just enough to finish this job.  Although, for some reason I have way more staggered tooth paddle racks than I need.  Teeth are staggered to make slippage much less potentially catastrophic for the wooden paddle if they dropped suddenly.
With the lock gate parts are a wooden mooring stump, also made in steamed pear, with splits, rotten centre in the top and rope grooves and a fence panel, which will give a little privacy to the outside toilet door on the end of Tony Moss's garage office.  This was made from steamed pear veneer, cut into slightly irregular strips and fixed to pear strip posts and battens.

That's it for a while, chaps.  Off tomorrow to pick up bits for yet another Special, a Burlington Arrow, made of a Mk IV Triumph Spitfire, but that's for another time.


Taking stock...

Tantalisingly, during my week of forced absence from the ether, my son brought round the remaining buildings I have which I have started over the years.  All 7mm scale.

These were all made for my lantern Yard set-piece.
I wanted to play around with corrugated iron and made a small press tool from styrene bits, located with some styrene tube.  This makes a scale sized sheet of Corrugated iron, or asbestos, dependent on the finish.  I use Chinese takeaway trays foil which is just thick enough to have some strength.
Just put the scale sheet, a little over width to account for the forming using up some width, in the tool and squeeze in the vice.
Paradoxically, having made flat sheets, I decided to make a much modified Nissen hut as the small car workshop and general mechanic's place, so had to curve the sheets.  Easily done over a curved form. Be gentle and it will take up a shape, without kinking, keeping it nicely.
High up windows necessary for the light needed to fix anything and everything.

Needless to say, like most mechanics, this guy started as a blacksmith and just spread his skills, the way of most country garages.
He does however, still do a fair bit of smithing and lives in the original smithy's cottage that he was born and raised in.
This is the cottage, with the brick and slated forge building an add-on to the side.  The back additions are so typical and based on a cottage in Upwell.  The kitchen is the first addition, brick, with a pantile roof and an old chimney coming up from where the washing copper was once installed, but now replaced with a small Raeburn cook-and-heat stove. Then, deciding that a grubby blacksmith/mechanic needed a bath that didn't always have to go on the living room floor in front of the fire, he added a blockwork bathroom, rendered, under a simple cement tile roof., with a second hand window frame, "relieved" from a building site in the nearby town.

The pantiles were made by bending two strips of thickish litho plate to act as a press, then cutting strips of thin card, soaking them in the steam from a kettle and laying them in between the plates and weighting them down.  When dry, the individual tiles are cut with scissors and laid from right to left, bottom to top.  Seems to have worked.  We all think we know what pantiles look like, but actually, they are rarely what you'd swear blind they are!  These are carefully measured from slipped tiles on a local semi-derelict building.


And.....done!

Today the wee PC man came and worked some magic, so I'm back on at last.
To be honest I can live without Facebook, despite getting most of my work with it, but my customers know my e-mail and phone number.
But I am enjoying the blog lately, filling in with some stuff old, some stuff new.

In the enforced absence from the ether of choice, I have finished the Lantern Caff.

Some gutters made on my little press tool from pewter foil and a downpipe from 3/64th" KS Metal Centre brass wire.  I also made the mounting brackets by impressing two ribs in a strip of pewter foil with the rounded, well worn end of my steel rule, then simply wrapping round the brass rod and securing with a tiny bit of superglue. The ribs remain just enough to show even after curling round the rod.

Nice pale chalky matt blue Vallejo paint which I usually use for painting racing drivers' suits, mixed with a little off white.  The Vallejo didn't set quite matt enough for me, so I went over it, when set with Gouache.

A bit of sooty discolouration around the stove flue.  Don't ask me how that happens, but it does. Ask any caravan/narrowboat dweller, so I gave it the boaty look secure in the knowledge it's right! That muck gets and then runs everywhere!

A bit of hand lettering for the TEAS on the roof and the name on the shiplap completed the job.  I haven't got round to the powdered pastel yet, but I have had to do some "earners" this week.

Friday, 22 November 2013

Lantern Cafe, almost done...

The Lantern Caff got a few hours spent on it today just for a break in car work and here it is.  Tiles from cartridge paper, with a few split and broken ones, even a couple of broken pieces slipped down the roof. The ridge tiling changes with the wooden extension, as will the character of the slates when I'm done with them.
Some weathering done to the slates, but more individual colouring yet to do.  Mortar is brushed into the bricks, but doesn't show.  The woodwork is done in a washed out pale blue.  I like that colour along with pale greens too. I remember them being used on various wooden buildings of my childhood, so faded they were almost chalky in their deadness.  Lintels and cill are treated as concrete.

I would love to point out more, but it's hardly worth it when I just can't get a decent close up picture. I've just got this camera and it takes great daylight pictures, but close up is shit!  Macro, rest it on something, put a couple of lamps on, blah, blah. I really am sick of this digital crap not working. This is the first time today the internet has worked, too.
When I had a proper camera it showed me if the damned film would be blurred. Digis always show a pretty picture in the screen on the back, then put it up like a blurred dollop on the PC.
So, this was the only shot worth a toss and likely to be the last until someone who can be bothered with all this binary crap can explain to me how to make it work.

Thursday, 21 November 2013

So much to do, so little time....

The reason I can't always keep up with the blog is that I don't just do model buildings to please myself.
Rather, I do master patterns for kits and the occasional one-off for a collector, etc.  Not many of those recently, but patterns for model slot cars, aircraft and some model railway stuff have come thick and fast.

Currently this is nearly finished.
Invicta S-Type Low Chassis.  A 1/32nd scale pattern for first, a white metal static model and then, with some simplification, a slot racer in resin.  The Gauge 1 model railway people would, no doubt like the static model.

Then there's this:-
1/32nd scale, also.  A De Havilland DH 89a Dragon Rapide.  Pattern for a very high end model kit for a new French company.  So high end that this tiny photo-etch fret of 3 thou. thickness had to be done from my artwork to put not in the kit, but on the master.  Even finer p/e bits will be in the kit, including the flying "wires", bracketry, cockpit detailing, etc.  The artwork for this, by the way, was done by pen and photo-copy, NOT computer. Fortunately, my client was able to use it. He has his own photo-etching machine and process.  BUT, no British firm will now accept pen a/w for etching any more, even PPD, so I don't know how to get any, as I cannot make head nor tail of computerised artwork!


                     And this:-
Pilatus PC12 master in 1/72nd scale for a British kit manufacturer of rare and interesting civil aircraft.

Along with a cordite van in O9 from Waltham Abbey Gunpowder factory and a 2mm scale Kitson 0-6-0.
The latter is in nickel silver and brass to fit the excellent N-Drive 9mm gauge chassis.  Here are similar masters I made earlier. A Quarry Hunslet in OO9.

and Effie, a Hayward miniature loco in O9
Both in nickel silver and brass to fit the N-Drive chassis and now cast in white metal.

So, progress on the model buildings might be a bit slow, but then again?....

Wednesday, 20 November 2013

Lantern Caff contd...


Done a little more on the Lantern Caff today.  I thought I should put a bit of interest inside the little establishment, so I knocked up a table and chair and laid the table with knife and fork squashed from thin solder, a mug of frothy cocoa and a salt cellar.
The windows are simply framed as main pane and fanlight, as befits a "conversion" done more for profit as a Cafe than an architectural gem.  The frames are styrene strip sliced off some sheet.  I'm far too tight to order and pay postage on Microstrip!
The glazing is some spare clear from my son, who has a big old (1963!) vac-former and makes all sorts on it.  I'm never short of food quality glazing!
The facia boards are also added, ready for the roof slates and subsequent guttering.
The strap hinges and latch pate are from my old etchings, shown earlier.  Slates tomorrow.

I also cut out the openings on the Moss garage workshop frontage in Foamex, which I am really getting to like.  Note the crispness of cuts. Much easier than thick card.

Tuesday, 19 November 2013

At Ferry station today

Well, since Am Tec seem to think that they can flog you 10 hacksaw blades that have bent ends, misplaced pins and rust on them, I had to go into town to pay through the nose for some from B&Q.  So, while I was there, I thought I might as well go outside town to visit the wonderful station in the last post.  I didn't realise Ferry had a station house till after I'd posted, but the house is still there and beautifully kept.

So off we toddled down a tiny dead end lane and there was the Station house right in front of us.
I knocked on the door and a very nice lady welcomed me in and offered to show me the old ticket office and waiting rooms.  Original tiles in the hall and evidence of the original M&GN green paint.  Amazing.
I took pictures and she showed me her own collection of photos, of which this was one, showing the general layout.
The cobbles, bottom left are there to this day.
Note how the rails don't actually go by the station house platform, which is also still there, though it is and appears to have always been, very short.
I understand that changes were made to the house during M&GN ownership as the M&GN Circle have plans which I will send for.  Clearly, the portion of the building to the right of the front door is built in stretcher bond, clear evidence of a cavity wall, whereas everything else is Flemish bond.  A wee mystery to solve.
The main brickwork is surprisingly fancy, with yellow string courses.
I would think the square gutters and downpipes are not original.
The lady thought these were the original chimney pots, but couldn't say for sure, but they're very fine.
And she also thought the stained glass door window was original, but I really think that's pushing it a bit too far.  Nice door though!
So, now I need to find track plans and details of the goods yard and that building that is no more.
This is where it was. The concrete posts are originals, made by the M&GN at Melton Constable, the railway's main depot.  William Marriot, the Chief mechanical Engineer, developed re-inforced concrete back in the mid 1880s and made a good separate business of it.  Even the station name board was concrete as were signal posts, bridges and even the very first concrete sleepers, something which now blights our landscape universally!
The building I was really attracted to was just where that little tree grows now


Monday, 18 November 2013

Why do I do these things?...

I was just mardling through some searches for a 7mm scale version of Iain Robinson's model building blog and I came across these.

Now I was always aware of the existence of a Ferry Station on the old Wisbech North - Sutton Bridge branch of the Midland & Great Northern Joint Railway, because I've been a huge fan of that lovely old railway since I was about 13, but I'd never seen a picture of it.
It's just too damned gorgeous to resist, so I won't.  It was also only a few miles from where I live now, but I'm sure there'll be nothing left of it, but that ain't going to stop me having a damned good look for it, possibly tomorrow!  I know there's a road just outside Wisbech that goes towards the river, called Ferry Lane, so that must be a start.
It's clearly timber framed, on a blue brick footing, nice!  Then there's that lovely portico on the platform door.  A gent's at the end, which implies a ladies' inside.  The platform lamps are just itching to be modelled as is the whole thing.  An ash platform too!
The full McCoy.
Stone gate posts, telegraph poles, brick-on-edge at the crossing and could that be a bit of platform garden I see?
This would make a nice thin set-piece, enough for a loco and a 6 wheeler or two.  I once made the Hudswell Clark 4-4-0 tank in 4mm when I was a kid.  I think it's time for a 7mm scale one, if I can find the drawings somewhere.

Guttering woes part 2...

I found the tools I used for making gutters from pewter foil.
They are simplicity itself.  Made from KS Metal Centre telescopic brass tubes and soldered to a bit of brass plate.

I'm afraid even with my new camera I just can't take close-ups without blur, but you should get the idea, until I can make the camera work on macro.

The finished gutter section at a scale 6 feet in 7mm scale is the silver bit, complete with joining flange pressed in.

Sunday, 17 November 2013

Guttering woes...

I've been reading on the blogs of Iain, Chas and lnr about the woes of finding enough Evergreen half round plastic tubing for making gutters.
I didn't even know it existed, so have always made my gutters from pewter foil, cut in strips and pressed into a dip shaped in some styrene sheet with another bit of sheet with a bull-nose section on the end.  I find long lengths difficult to deal with, so I make it in scale 10ft (ish) lengths as in the real stuff. It can be trimmed with a knife against the styrene "press".  If you dig a little dip out of one end, you can press the last mm or so into that to get the widened section that the next slides into.
Pewter foil is obtainable from craft suppliers. It is generally know as Repousse Foil and is gold coloured one side, silver on tother. It has no spring whatsoever and is extremely malleable.  It is easy to fold or press into other useful shapes, such as zinc flats over bay windows, church roofs, rainwater hoppers, etc.  My Dad was at one time a craftsman plumber and I used to watch him making lead and zinc roofs, with special hammers, soldering them with a half pint bow lamp and a stick of Tinmans' solder.  Working pewter foil is very similar in miniature.
I have no pictures of all this until I can find my old tools, so keep looking, I will make something up to show.
As with most fiddly sounding jobs, it actually doesn't take long.

BTW, I found that scale gutters look too wide, so I always make them a bit smaller.  it is, ultimately, the look that's important.

Saturday, 16 November 2013

The Lantern Cafe

Two posts down is a front wall, as if of a hut, brick built, yard/coal office kind of thing,  Well, the muse is upon me and I had to get it made into a suitable place to put on Lantern Yard, so I thought "how can I make it a bit bigger plausibly with interest?"  It needed an extension to hold the kitchen area as I'd resolved to do it as a cafe.  So I added a wooden extension in card planks and pearwood posts.

The wooden extension, enough for a small kitchen and a bit of extra seating.

Notice the bit of bent brass tube.  That's from the coal stove that struggles to keep the customers warm.  As yet unfixed. Here's the corners of brick, a bit blurred, but showing the cellulose putty filling the gap.  The big problem with vac-formed brick sheet is the little gaps left by the process when you cut the sheet.  Here they are filled and sanded back and the courses run round with a triangular Swiss file.


Friday, 15 November 2013

One of Gilbarco's finest...

Because the sparks is in to fix the shower and replace the fuse box, we've had a very quiet day so far.  No power, ergo, no telly, radio, pootah...
In fact I had a nice read of Tom Rolt's Lines of Character while I ate my lunch...a fell asleep!

Just before that I thought I would take advantage of the wonderful autumnal sunshine and shoot down to the next village, where I used to live to see if the old pump was still in Old Man Simpson's old garage.
I used to live next door to this impossibly small filling station and based my artwork for the etched pump components on this lonely old Gilbarco.
Well, I should have know n that it would still be there.  I haven't been near this spot since we left to live afloat in 2003.  ten years ago the sailing dinghy on its trailer with its anodized mast was quite serviceable and the paint was just starting to crack a little on the pump.  Today, the dinghy has rotted right through about 4 feet back from the bow. The trailer and mast are fine and look at this old soldier now:-
You can see the two pre-fab concrete garages in the background which were the workshop for this tiny place.  The house across the road was where you paid!
That crazing is the sort of thing only Chuck Doan attempts on his large scale set-pieces!  It takes 10 years for this to happen and is the result of shrinkage of oil painted re-coats on stove enamelled originals.
I was taught technical illustration by a man who was himself trained by Gilbarco in their drawing offices.  Chances are, this pre-dated him somewhat!

The rope is holding White Rose, an old Springer narrowboat, which, despite being falling to bits and which hasn't moved for Gawd knows how much longer than the 20 years I've known it to be sitting there, untouched., is still afloat.

Thursday, 14 November 2013

Testing, testing...

As promised, the test piece for scribing, or more properly, embossing this clever stuff I am calling foam board, though I fancy I have the wrong name for it.  I have heard Forex and Kappa used.  I will find out, though.
Anyway, what a success.  Without scheming up any clever tools, just using a slightly blunt end of a scriber, I pushed into its fine surface bricks, English bond with a soldier course, stones, as in Welsh, for instance and wonderful Norfolk Carrstone with yellow stock quoins.
Quickly painted with mainly Vallejo acrylics, which sometimes matt and sometimes don't, so after they dried I gave them a quick spray of my new best friend, Mr. Hobby UV Cut Flat ( ain't that the dumbest name ever?) and it matted off just right.  Excuse the slightly woolly edge between the Carrstone and the quoins.  Wrong paint brush. I'll use a chisel point next time.

Here's the result of ten minutes work.  I haven't done any weathering at all on this sample yet, but will post again when the gouache and pastels come out.
I am hooked on Forex (or whatever it's called)

Brickin' it...

Whilst looking for paper briquettes to burn (unsuccessfully, we've burned them all), I came across an old envelope containing some of Dave Ellis's (Sth. Eastern Finecast) brick sheet.  I hadn't touched it in ages as I was convinced it was 1/32nd scale, but I pulled it out to discover it is in fact his excellent 7mm scale English bond.  Dave's sheets are vacuum formed.  He does a huge range and they're not expensive.
Now many assume that, because they are vac-formed, that they must be all rounded off and no good.  Well, yes, they are rounded, BUT...if you just file/sand/scrape them just a bit, they come up really well.  The beauty of this is that you get to control the degree of mortar course that you want to see.  So, if you're looking for a worn out, uber-weathered wall with little pointing left, you can almost leave the sheet as you find it, OR, file it till you have a nice, well laid thin mortared bit of bricklaying.
Thinking I should prove my point to all you inevitable doubters, I did this little bit of wall, as if for a wee hut, for instance.
I've tried to accentuate the effect by fiddling with the contrast and brightness here.  But note that the spare bits cut out of the doorway and window are indeed rather rounded off. Very "cobbly", but the wall itself has been filed down in just a couple of minutes to reveal a nice tight mortar twixt flat sharp edged bricks.  I have left it a little less filed towards the bottom of the wall which is where the pointing might be expected to be a bit worn with rain, etc.
Please click on the picture to see it more clearly.

Just behind it, is the other experiment I mentioned in an earlier post.  This time using foamboard as the main structural material, instead of my usual, but increasingly difficult to get material, 1/8th" card.
Well, as you can see it was a complete success. It cut cleanly with 2-3 light strokes with my fold up Stanley knife (another great Lidl's or Aldis purchase).  It stays perfectly flat too.  You can see where I've angled the side cuts at 45 degrees in order to mitre the corners, leaving no awkward joints.  I am very impressed with this stuff and will be putting in an order with my No.1 son for some more. He gets it from a mate at work and can have all he wants.

So, here, in a few posts, we have Slater's moulded brick sheet, sanded to sharpen the bricks and Sth. Eastern Finecast vac-formed sheet, filed to sharpen.
I prefer the latter for its increased controllability, but am happy with either.
All that remains is to try scribing foamboard as bricks, for those special jobs or stone and the experiment, Igor, will be complete.

More soon.

Wednesday, 13 November 2013

Prototype for everything department

As we were charged with collecting the grandson from school today, I took the opportunity to drive a little further and take some pics of my chum's old country garage in toto.
I have shown pictures of the office on here in model form recently, so now here are the shots of the real McCoy, now more dishevelled than even my model!
This is the full extent of the buildings.  Many years ago the other side of the office was a Nissen hut turned into a large cafe, which flourished for years, but is, alas, long gone.  Immediately behind these buildings runs the Well Creek, which was once, astonishingly the alignment of the original River Nene, before it was cut through Wisbech on a much quicker route to the sea.  The Nene, in fact, used to flow into the Great Ouse many miles inland.
Note the narrow boats.
With almost nothing holding the roof up and the window frames falling to rot, it's obvious this is earmarked for redevelopment very soon, hence my taking these shots before yet another English country garage disappears for good.  Tony was unable to maintain a fight against theft and vandalism in the end.  Add new rules from Brussells about fuel tanks and he was wiped out completely.  EU vandalism is as responsible as any other kind.
For fans of old petrol pumps here's a full on view of one.  I should say it's not that long ago that we used to buy our fuel here.
Here's a study in rotten wooden  doors
These will tax my weathering talents, such as they are.

I shall be using earlier style pumps which did used to be here.  I had the fiddly bits etched from my artwork years ago, when it was cheap, quick and easy so to do.  Not any more!
The keen-eyed amongst you will spot name and builder's plates for some narrow gauge locos also on the fret and some nice Edwardian villa window frames. I have lost all the rest, unfortunately.


Tuesday, 12 November 2013

You look washed out, son...

I am convinced that models look much better in black and white, so having finally realised that I can use Paint like I used to use Photo Editor, I gave it a go.

Here is Tony Moss's office so treated.
And the motorbike shop, now sharpened a little and B&W'd.
I'm not a lover of colour!


Old now, but unbowed...Lantern Yard

Finally, I put the old girl on the ether.
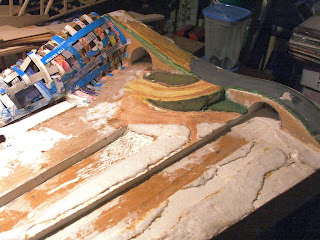
Lantern Yard.  A 7mm scale set-piece intended to show off my model of Heather Bell, our old historic narrow boat and a few of the model cars I've made the masters for over the years, not that I have many of them.
Now, this has been in damp, unfriendly storage for 6 years, as long as I've been back"On the Bank" in fact.
I knocked it together in gaps between working on the boat. You really don't want to see underneath!  But that doesn't matter.
It represents a bit of the Welsh Marches area, Montgomeryshire/Welsh Canal, for which our boat had been specially built in 1937.

It's made of 6mm plywood, with a few landscape formers in same and a weave of cornflake box strips to describe the topography, prior to Modroc plaster bandage, except 6 years ago it went into the damp storage and there it has remained except for the odd application of Polyfilla and a try out with my favourite grass system, medical lint.  So the remains of the card strip has been chewed by meeces here and there.  Now it's in the proper workshop again, I'll shellac it. The old ways are the best.

On dragging it out, I see that the roadway has started spiling off and there are a few cracks around.  I also seem to have cut into the hillside for a few small buildings.  I can't remember that!  I have also given my son the buildings for his 1/43rd scale slot racing hillclimb track and I don't think they'll be coming back, except for photography and description, if he can find them. He works in a worse mess than I.
The various bits of paint are not modelmaking, just thinking out loud, which I tend to do when I knock up a quick set-piece.  It'll more likely as not be quite different when it's done.
The basic plan is that Heather Bell will be in the arm, just beyond the lock, waiting for orders.  On the wharf will be an 18" gauge mineral line from a local estate cum quarry/sawmill.  Usual fiction.  18" gauge gives me enough space, whilst maintaining 7mm scale.  10.5mm gauge, a loop and a headshunt/engine shack should do it.  The railway then disappears under the bridge in the corner.

The buildings will be a blacksmith's cottage and an old Nissen hut workshop, wherein these days he does a bit of motor repair.  Set into the retaining wall where the vehicles drive down from the road will be a small cafe, which has become the Saturday club for the local old car and bike brigade.  Attached to the engine shed is the yard office, euphemistically known locally as The Depot.  

And that is or will be, Lantern Yard.

More anon.