Monday, 28 November 2016

Noticeable changes on Lantern Yard...

Having nothing else to really fret about, I decided to get a bit more done on Lantern Yard.  I have loads of 3mm thick Foamex, so cut that to act as a foundation for buildings and glued down some Peco narrow gauge track that I was given.  I hate the stuff, so will be happy to bury it all under filler and leave just enough rail to run on.
I also got a pot of tester emulsion from B&Q's and painted the areas where one might expect a well packed 'oggin, so a sandy shade was selected. It also acts as a sealer, but then my chum, Lloyd, said he'd painted dilute PVA all over his scenery.  Why didn't I think of that?

Anyway, here's the board as of earlier today.
I made the point using some cheap PCB sheet which I cut into strips on my mini circular saw.  I have another to make for the other end.  Easy enough job, but I have no idea where to cut the grooves in the copper or how to wire the thing.  I've made track before, but never used it.

The white building is the blacksmith's house and workshop and the black one is his son's workshop.  I have widened the approach slope.  The cafe will go this end or may end up on my Southwold set-piece as it's shiplap.  And fishermen rarely ever eat fish, so they'd need a bacon butty with their cocoa of a chilly morning.
Also new is the hole in the canal which is to take the narrowboat rear end so the bottom of the boat appears lower than the water and the back of an empty boat is well down at the starn end.  
More as it happens.

Sunday, 27 November 2016

You can almost smell the sea...

I have always been an estuary and small seaside fan.  But something that always put me off modelling same was the apparent impossibility of reproducing lobster pots. Some call 'em lobster traps, for that is exactly what they do.
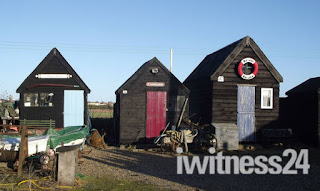
What I need to reproduce is this sort of scene.
Especially those pesky orange netted things...and quite a few of 'em too.  I didn't want them in orange or the also common (these days) blue, but just that manilla-ish hemp looking affair on a slightly barnacled framework.  Something sufficiently plausible to be stacked, as they usually are, about the place near harbours and sheds.
The main problem was finding a mesh small enough to represent the netting.  A very fine thread making a mesh of about 0.75mm. was called for.  If I could find that, I could then make a framework from brass or nickel silver wire, soldered up and then glue the mesh over it.
To my surprise, after only a short while thumbing through ebay, I found what looked to be a very usable mesh in white. I ordered a chunk, which came with free delivery. How DO these companies do that!?  Everything I send, even second class costs a bloody fortune these days, yet there are those who send something worth less than the cheapest postage free of postage fees.  I'm almost embarrassed to do it!  Almost.
Sure enough it turned up in a couple of days and seems to be exactly what I needed.  Trouble is, my worktops are both white.  And I cannot see this stuff when it's on white!  That's how fine it is.  I shall have to organize a bit of black stuff to make lobster pots on.

Now I have never had the slightest luck with superglue since it first appeared, except for gluing loose bits of set Milliput filler back onto masters or gluing broken polyurethane resin mouldings. Both of these things it does very well, but anything else?  Forget it.  Including, it seems, model lobster pot netting, which said glue completely ignored.  The only other stuff I had was some 151 clear glue, a bit like UHU, a bit like Bostik. Of these two I would always elect to try UHU and so this was pressed into use and blow me down with a battery fan if it didn't work straight away!   Even stayed on well enough for me to use a pair of scissors to trim the bottoms and ends back to the wire frame and then to cut and trim the end panels to the correct shapes.  This, then, gave me what I have tried to do for so long, a half decent, plausible looking lobster pot, a couple of scale feet long and proportionately high and wide.  Three sticks of wire were glued to the outside according to pictures and the whole thing painted with Vallejo flesh coloured paint to represent the sunbaked, sea-washed netting.  I shall make another one today, so I can say I have made a stack of pots.  All two of them.  I should also say that I have no idea howto photograph them!  But you get the idea.


Monday, 21 November 2016

Tar your wherry...

And paint your house every three years, they say.

Well, this shed at Southwold was very recently refurbished and tarred.  But, black as tar can look when it's new, it's not a good idea to have it like that on a model. It just looks too black and too clean. Even on a recent tarring, there can be a hint of silvery wood behind the black and in order to get that effect I bought the micro pot of silver grey mentioned in the post above and painted the shed with that first, then, when that had dried, I used some back gouache from the palette, softened up with water and went over the silver, taking a little of the black off with a cotton wool bud.  Seems to have worked quite well.


I also represented the roofing felt with scale width strips of 1000 grit wet'n'dry paper.  Unfortunately the clear general glue I used in the absence of proper Evo-Stik as used to be in a tube before they changed the formula, refused to really work on the paper and is still lifting, so I may yet have to mask the roof from stray glue and poke something stickier between sheets.  However, the basic impression is good and I am satisfied with it.
All the shed needs now is it's door fitting with hinges and lock and painting faded blue and a window frame and glazing fitted.

I'm still trying to work out how to represent netting so that I can produce lobster/crab pots as I need a fair few of those.
I might have a bash at a rusty old winch next.


Come, friendly bombs and fall on Humbrol...

Swarm over, Death...............with apologies to John Betjemann...

Really, though.  Why, after all these years, is there no regularly seen option to the above junk in toy/model shops.  Revell, in exactly similar tins, was no better either.
In the good old days I could stock up on Floquil, of blessed memory and infinitely superior quality, but that had its formula changed and was emasculated years ago. With the demise of Victors, the shop, you can't get it anyway any more.  Testors wasn't bad, but the importers no longer stock it and they were within toodling distance of me.

I NEED enamel to coat plastics used in building models as a first coat, then I can get away with gouache and watercolour overcoating, with powders as final colouration, but I would love to approach a stand, designed to be approached, not worshipped at on all fours, which has colour plates on the shelf edges that bear a slight resemblance to the colour on the tin lid and wouldn't it be good if the colour chart was anything other than emergency toilet paper?  But the main thing is that it would be nice if, every time I go reluctantly, to buy another micro-tin of this garbage, it hadn't increased its price by another 10p a tin.  It is now £1-90 for a tin, so small, that if you actually drank it, you'd barely taste it, much less do yourself any harm.

No doubt it's all part of the inexorable drive to force us to buy that water based crap called acrylic. Now I am of an age where acrylic is clear hard plastic, called Perspex.  Not paint for heaven's sake. So Humbrol's second display stand is little more than a huge paperweight to me.  Maybe somebody should remind them that their name is a contraction of the Humber Oil Company.  Oil! Not pissy water.

I have bought today a tin of silvery grey, which I did by completely ignoring the colour chart and a tiny pot of brick red, which, if I'd have bought a tin called Brick Red, would have been a vaguely milk chocolatey shade of Gawd knows what muck.

They'd better work and be completely matt, or, by God, I will fast become their worst nightmare and enjoy every minute of being so!

Sunday, 20 November 2016

More than before...

Having decided that even Facebook pages cause offence sooner or later, I have resolved to keep my posts confined to this blog, so there'll be more than before as they will not be thinned out across the pages of that odd format.  And, of course, I am no longer in any forums.

Southwold

I have been mulling over the idea that if one might engrave or impress detail into the surface of Foamex, my new favourite material, there was no reason why shiplap couldn't be done the same way. I had already used thin card, as has everybody else, to represent planks of wood on a building, but it is tedious to do and without decent glues like the old tube Evo-Stik to rely upon, it was even more difficult to do.  I believe it still has it's place, especially where some dereliction is required, but the essence of a convincing group of shiplapped buildings is that some are almost pristine, amongst those that are falling apart.  A bit like putting German lakeside boathouses in France!  So card strip remains the way to do the derelicts, but my experiment with the smart shed was a complete success.  This little structure is entirely impressed, with only the corners, window cill and lintel added, in thin styrene.

The roof is also styrene, as are the barge boards and finials, but the lion's share of what you see is impressed Foamex.  I found that initially I was getting a rather rounded plank edge, so I cut the Foamex where the dip of the lower plank was to occur and this simple expedient allowed a nice sharp differential twixt upper and lower plank.  The actual impression being achieved with the sharp corner of a short, stiff steel rule.  The corner planks were then added, which disguises the fact that the box of the structure is just ends overlapping the sides.  In future I will probably make the corners mitred.  It's easy enough to control a decent knife at a 45 degree angle and gives a much wider glue area to the joint, making it look better and a lot stronger.

Finally the nails were impressed by one of my favourite tools, a 1/32nd scale model aircraft rivet embosser.
It came as one of a pair with lovely mushroom handles in beechwood, like the very best engraving tools, for a derisory few pounds from The Scale Model Company, an internet model shop.  With the lightest of dabs it puts a perfect tiny ring shape in the planks. Some have both nail heads showing, some (completely at random) have only one as the other will be hidden by the plank above.  A neat wee detail, I think.


With some hinges and other door furniture and glazing and framing for the simple widow, this will be ready for painting.

Saturday, 19 November 2016

But seriously folks...

Amongst the list of the blogs which I take a gander at from time to time there are, or used to be until I grew tired of them, a couple which ask terribly deep and meaningful questions about one's attitude to modelmaking, life, the Universe and everything.  The answer as we all know is 42, so goodbye and thanks for all the fish.

No, no, can't we have a few of our own?  One occurred to me today whilst idling a couple of hours away on Lantern Yard's substructure (the bit the meeces made lunch of).
Sonnie Boy's workshop

How should we approach the landscape which is the main feature of our model railways.  Or our model set-pieces, if, like me, you don't actually need a railway to make scenery.  I have put a small rail section in Lantern Yard, only because I made masters of O9 railway locos and wagons so I need somewhere to display them.  But it doesn't need it, because it displays an earlier form of transport...or use of the landscape, if you like.  It has a canal.  A wharf and a lock.  These would predate the little 18" gauge railway by at least 175 years astonishingly.
So, I got to thinking .....build the landscape, then plant it, then build ON it.  Only in that way can the eventual model have a sense of authenticity.  No good putting a railway down, then building a landscape around it and buildings by it.
I suppose one could make a case for building INTO the planting, yes, there will be some of that on Lantern Yard, where the blacksmith just couldn't resist the sale of an old Nissen hut after the War, but had to dig out a fair chunk of hill behind him.  He did it, but was to be troubled by damp ever after, partly through too close a proximity to the digging and partly through the entirely predictable lack of sufficient drainage, but he would NOT be warned while the euphoria of acquisition was upon him and planning permission was negligible in those days and in those rustic parts.
So, this is the state of play at Lantern Yard. A justifiable small cottage and workshop for the blacksmith, a small wooden cafe with a brick extension for his wife to run and then the irresistible Nissen hut sections, which finally....... finally, he could use to set his son up as a mechanic and get him out of his hair.  He'd tried to get him a job on the boats, or even the railway, but he was warned that the boats had maybe 10 years if they were lucky and the railway couldn't sustain a full time mechanic.
The blacksmith's cottage, NOT in its final spot

Sonnie Boy had got himself quite a reputation as an expert in the strange little (mainly) German three-wheelers that were getting people mobile since the War and he could fit a couple in at a time to repair, do up and even, occasionally, sell.  As long as he didn't touch the canal boats, their engines and very occasionally their horses' hooves, a certain peace existed between father and son.  The old man even tolerated the railway, because its presence ensured some future for the wharf.

More of Lantern Yard as it happens.  A kind of Little Lake Woebegone in the Marcher country.

Friday, 11 November 2016

Winter is a comin' on...

And when it does, I get all scenicky.  Come Spring and Summer it's boats and gardening, but as the days shorten and the shed becomes too cold to work in I come indoors and set up to work in the warm.  The scenery is always couched in an apparent love of railways, but really they are just an excuse for my particular kind of bucolica.
This has always meant muddy creeks and boats, shiplap and black tar varnish.

Now nowhere is that more concentrated than at Southwold.  A sleepy Victorian seaside town on the Suffolk coast, once quite a port and a big fishing centre.  Its foreshore is a collection of fabulously assorted shiplap sheds, converted railway vehicles and smart new, but still tarred shiplap.  Dozens of them. Between them are boats old and new, rusty winches, slipways, rotten wood, lobster pots and general, but lovely decay.
Here:-
Oh I love all this stuff.  And all the junk around it.
This is a Great Eastern 6 wheel coach which has been cut in half and brought in on a lorry presumably as the Southwold Railway was 3 feet gauge with an unusually narrow loading gauge, so couldn't have brought a standard gauge coach in, although the line ran just behind this scene all down the harbour to a weighbridge at the end, near the sea.

But how do you make a 7mm scale lobster pot?
See those buggers?  I've looked but I can't find any screedlike material that'll do that even if I make a wire frame.

Anyway, I started in 7mm scale to make the locomotive, Blyth, a 2-4-0 by Sharp, Stewart.

And the buildings, a smokehouse stall and a fisherman's hut.
These Foamex structures will be covered in strips of thin card to represent the shiplap so typical of the coastal shacks and sheds.

In between this I had promised a friend I would do him an Austin 7 Ulster for his new venture in slot racing and to help sell his new photo-etched 19" wire wheels.