Monday, 9 March 2015

If in doubt, give it a bash, anyway...

A while back, last year, to try out my then nice new English Wheel and new "stump", I made a new front mudguard for the Cambridge Special.  This shows it before the tail flick was done.
Now I reckon it'll be sufficiently strong if I just mount it securely, but general thinking has it that we should roll the edges, either in a false wired edge or a real one.  A real one is a fiddly job, but not that difficult.  However, my son insisted that the aluminium would need annealing, just like when he worked for a classic racing car restorer.  Now, I have always shied away from annealing aluminium.  The softening point is over 500 degrees, the melting point around 600, so you'll always be dancing on ball bearings.  That and the fact that I've actually done quite a lot of small time metal bashing in ally without any problem.  I bashed it into shape over wooden forms to make a gutter system on my Fox van,  I made sub fibreglass shapes to support the GRP repairs on the same vehicle.  More recently I made the A-pillar shut face panels for my son's Triumph Renown....all without resort to the annealer's flame.
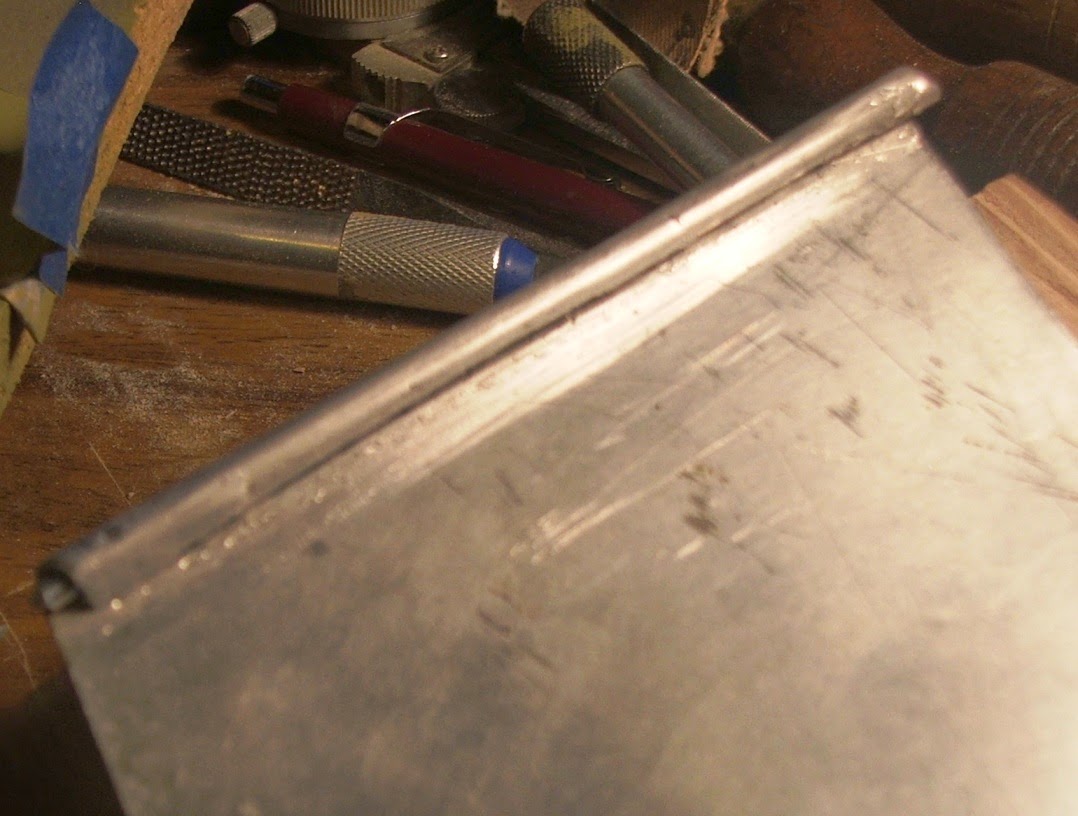
So, I thought, what's so difficult about rolling 6mm of it over a bit of wire?  Well, erm, nothing, it turns out.  Look.....

I will, when I can find a bar of Simple Soap, try this annealing lark.  It seems to help, but I don't see it getting done noticeably better than this.  This took me maybe 20 minutes, after I'd chopped this little chunk off.
I mean, considering that I just had a sudden whim to try something I'd never done before and got on with it, with possibly less than suitable tools and, with little time, less than complete care.  I didn't have any steel wire, but I did have some 2mm ally Tig wire, so I used that.  Seems more sensible to put ally in ally. I never liked the idea of steel in ally anyway.  Recipe for terminal rot.  
Another ten minutes with a thumb full of 240 emery and there we are.  I don't see any cracks, but maybe, doing a whole mudguard, I might have changed my mind and decided that easy beats falsely lazy:-)

Saturday, 7 March 2015

Spring is sprung....

I do love it when I go outside and sniff the air like a gun dog and decide that Spring is sprung.
The daffodils are poking their little yellow snouts through the Well Creek banks where the Snowdrops are already bravely waving, the sun is warm, but for the North Westerly and the dogs are running around like headless chickens for no obvious reason at all.

Over the shed, the roof is warming a little, enough to get in there for a tidy up.  That, I've done today and yesterday and made a lot of new space.  So much so, that I fixed the bandsaw with a wee bit of molybdenum grease on the shaft.  Cut some blocks of wood and glued'n'screwed them to the jig in which I will make the new scuttle hoop for the Cambridge Special.  Whether I have enough 1/16th" ply to cut into strips, remains to be seen, but it's easily available, if not.  The original hoop was steam bent ash, but it's been eaten by insects and the corners have "relaxed" somewhat.  Fortunately I have the repaired and largely unmolested aluminium double bubble scuttle as a guide, so drew round that. Blocks rounded off, glued'n'screwed in the corners and on the slight top curve, ready for the strips. Tomorrow in even better promised weather, we'll go hunting for some more quick clamps at the Sunday Market.  You can't have too many when laminating.  To be honest, I can't even see what this component does, that a sheet of ply couldn't, but I have all the original frame for this body and the Cambridge IS an original period correct body, so I need to replicate the frame exactly.  I have all the original iron fixings and frame strengtheners too, so my path is clear.
I also have a steel bulkhead and floor, but they come from a short wheelbase version, which, since it fits a tapered chassis frame is by definition, slightly narrower, but has so many nice bits, that I will simply cut and widen it, to fit inside the scuttle hoop I've been concerned with today.  I rarely waste anything!

Here's my Cambridge body parts:-
You can see where the bulkhead is narrow and the hoop thing is that bit, just below the double scuttle.

Here are the steel parts, cleaned up a treat and sprayed black over self-etch primer.


And here's a friend's Cambridge frame and interior skin. The interior on his is only 3mm ply, but glued and pinned to the frame it is remarkably strong.
Guess where the above "X" frames go....
Note the dreaded hoop at the scuttle position. 

You see what the Spring can do?  It gets a chap all fired up to build his car.


Wednesday, 25 February 2015

A bit more brass...

As a wee continuation of the earlier blog about leaving stuff long and trimming it later, here's another example.  The steering yokes of the 1/72nd scale PC 12 master.  Once again my camera doesn't want to play ball, but I can't be bothered with that.  The essentials are there.
Firstly, we bend up the steering "yokes", one in each end of a shortish bit of wire.  Apart from easing handling of these tiny parts, it saves them getting lost in the wide maw of the carpet monster.  The tools necessary to do this are seen in the picture. Fine wire pliers and a set of flush cross cutters, neither costing much at all.
Having bent them up, they're tinned with a fine point soldering iron (I use a temperature controlled one that cost under £20 from Maplin's.)  Then tin the end of a second piece of wire and, gripping one end of the previous wire in the jaws of the vice, put the second wire roughly in place, but accurately in the centre and touch the joint with the iron.
Oh, BTW, the nose of the Ginetta G15 on the lamp base is of the rarest white metal model in world in that is the only white metal version of a resin model that was in my old Guild Master Models range of classic cars.  Mastered in brass, but never produced in w/m, apart from this one.

I digress...

Do the same to the other end and then clip off the excess with the cross cutters.  By leaving about 8mm on the column you can grip that in the jaws and clean up with knife and Swiss files. Finally clip off the yoke "handles"and any column excess poking towards you, cleaning back with a fine file.
Sorry about this picture, but my camera only does bright sun, mostly, but you can see the end result.
The instrument panel for the Pilatus PC12 master is made of Ureol and partially detailed with 5 thou. styrene.  The bulkhead and seats are also styrene as both will be cast in resin.  The steering yokes will be white metal, I assume, for strength.

Time?  About 10-15 minutes.


Saturday, 21 February 2015

Thoughtful?...or just psycho-babble...

I always connect to other blogs by clicking on Iain Robinson's blog and going down his side panel. Some of the blogs are short "review" types, some are updates on current layouts, but some, it seems to me, are intended to convince the reader that the author has some special insights or attitudes to modelmaking.  They ask complicated questions, ostensibly of themselves, but in fact of everybody, about readers' attitudes to their own work.  Now there are only 2 main types of model enthusiasts really.  Those who squeeze a bit of work in on a layout or model when they can and those who do it for a living.  The latter (with the noble exception of Iain's own writings) are few and far between. Naturally, the bulk of blogs are from the former category, but there are just a couple of a third category who do all the navel gazing, theoretical stuff,  Significantly, there is rarely much actual modelmaking done by this sub group.  They seem to spend so long asking all those largely unnecessary questions, that the bench is somewhere almost alien to them.

I make models because I can and because it beats working for some pratt in a leather chair who thinks he's better than I am.  I can just make ends meet by doing so.  I used to earn very well from it, because the going rate was worth doing it for.  Now, there is less work for my particular sections of what I used to do, but the over-riding fact was that I did it because it was the least worst option in employment.  I never gave the art/craft dichotomy a moment's thought, except to tell people on forums not to keep going on about every half decent bit of model making being a "work of art", when it was merely a competent piece of craftsmanship.  Maybe because all the men in my family were craftsmen, I am more than happy to be a craftsman myself.  Most so called art I see these days is so mind-bogglingly appalling that I would want only to distance myself from it.
There is a certain element of artfulness to some work, where one must make decisions on what to leave out, but that's it.  There might be a little artistry in depicting a scene cleverly, but it's craftsmanship that gets you there.

So why all the psycho babbling philosophising?  I assume it makes the authors of it feel somehow a cut above the rest of us.  But the proof, gentleman, of the pudding, is in the eating.  Show us something you've done yourself from absolute scratch and we'll see just how far all your day-dreaming has got you towards the aim of something beyond playing with trains.
So far, the best modelmaking, by far, is NOT in railway modelling, but in model cars, model ships, flying and static model aircraft and especially, model engineering.  In which, there is no bullshit about art.  Just good, honest craftsmanship by men (and sometimes the occasional woman) who are either self taught or properly shown the way, apprentice-style, by masters.
Let's leave all the art crap to the fakers and kite flyers who profess to be artists....Con artists, most of them.   Piss artists, the rest.  And as for the dreamers and question masters.  Complete wastes of space who are neither to any useful degree.

Sunday, 15 February 2015

The Latest Freebie...

My dear bride has a habit of telling me to get my arse in the car as she wants to go collect something she's found on one of the many local sites she frequents.  And Heaven knows, she's won us some goodies, from greenhouses to paving slabs.
Funnily enough I had just finished laying some of said paving slabs for the car to sit on, instead of grass today, when the little head popped round the door frame and said, "don't get comfy, we're off to Euximoor".

Euximoor,  What a name.  The locals call it "Exmoor", but Heaven forfend that a Fennie should open the mouth more than is absolutely necessary.

I knew of the place, or rather the road, for there is nothing there but a few dispersed buildings.  But I had never been over that particular bridge before.

Now there is "middle of nowhere", then there is "back of beyond", but this was "right out in the sticks and then some".  Out here you could be up to all sorts of tricks and nobody would have a Scooby Do what you were a-doing of.  The missing MG Magnette K3 could be in any of those ramshackle sheds behind suspiciously strong steel close boarded fences.  Chinese-run dope factories could be sitting steaming along powered by an illegal tap to the power lines,  a whole wooden village could be built from the old palets and fruit boxes piled by the thousands.
At the end of all this mystery and demi-dereliction, typical Fenland 'scape, was a surprisingly neat and clean old farmhouse where my PSE7 was to be collected.
For the strangest reasons he added a very early boxed Airfix Stephenson's Rocket kit and a Heller Jumbo jet in 1/450 th scale, which I'll build with my grandson this week.

You just never know what'll come up on these sites.

PSE7 is installed and running and I'm learning it slowly.  I used to have Photoshop 6, not Elements, on my old Mac, but this is totally different.

However, I put some pics in, of Elm church and corrected the vertical perspective of the tower and the chancel window.  What a fantastic effect for architectural modelmakers, as is the line drawing effect, which, nota bene Mr. Robinson, gives a much quicker, clearer impression of the depth and degree of stomework courses for when we go a-diggin' on the Foamex.

I would have posted an example, but I've no idea what PSE7 has done with my pictures!

Thursday, 12 February 2015

Investment in modelmaking...

A dreadfully serious sounding title for a simple aspect of modelmaking, albeit an essential one.

When building some shapes and fiddly structures, it is so much easier to pile in the materials, so that they are easier to assemble and then cut and trim the excess, effectively wasting or "investing" some material into the bits pot.
The alternative is to cut the individual parts to size and hope you can hold them all in place whilst soldering.  I am NOT saying you can't do it that way, but as I have to earn my living from these endeavours, I can't afford the hit and miss nature of that method.  So, I'll always work on the principle that it's easier to remove than to add.

Whilst making a new undercarriage master for the Pilatus PC12 master, I decided that though an early white metal nose leg was very acceptable, the earlier main legs were not at all nice and were way oversized, so had to be completely replaced with new brass ones.  The legs were handed, so two had to be made.
Here's the new legs. One finished tother day, but one done today.  Note how the long stick of brass rod is left attached to the bent part, soldered onto the end of the main leg's articulated member.
The leg on the right has the brass rod trimmed to rough length.  Rough, because we still have set up the position of the wheel and tyre combo.

Here are the two new ones with the old w/m one showing the hefty, unsuitable nature of it.  And that's with a big overscale chunk already cleaved off it.

Now, obviously the left over brass is still usable on other projects, but bits of all the rod used will have been clipped off and pinged away.  What gets caught, goes back in the bits pot and it's amazing how many of those bits get used eventually.

The main leg coming down from the fixing plate (about 7x2mm) could have been soldered straight on to the plate, but that would have been another pain to do, so holes were drilled in the two plates.  One for the 1/16th" diameter main leg and one for the 1mm bracing leg.
A small investment in 1/16" enabled that to be held in the vice jaws by putting a slight crank in it, so that a bit is in the jaws and another bit is parallel to the jaws, enabling the plate to sit on the jaws and be soldered to both main leg and brace at one sitting.  When happy with the solder clean-up, still on the brass rod, to enable easy clean up, the rod is finally clipped off, above and below the plates.  So you've invested in a bit of 1/16th" rod which now has a slight crank in it, but that can be straightened in the vice anyway.
Time-wise?  The second leg was assembled with solder as my wife called to say she'd made coffee.  I am still drinking that perfectly hot coffee as I type!

Invest in your cheap materials, not your own time.


Friday, 6 February 2015

So nearly gone...

Whilst out and about taking pictures of interesting local dereliction I also took these.

The Wisbech and Upwell Tramway was very evident when I first started travelling up this way to visit friends who used to restore old houses round here.  My friends took me to the old goods yard between Upwell and Emneth, where a sorry coach body still stood, full of the local legend that it had once been Queen Victoria's private coach, pinched from the Wolverton line, her local station for Sandringham.
After I'd moved up this way, the lines could still be seen on the big road bends heading towards Wisbech. Two sidings and a loop with the goods sheds and waiting rooms still there in the long grass.

Suddenly, they'd gone, without my ever seeing the men taking the lines up and the buildings down, despite it being on my only route to Wisbech from where I lived.

All that is now left are these small remnants:-

Here we have the old Outwell yard goods office with its original rail-built fence.  I assume it is now listed as somebody obviously cares for it and the fence.

Around the corner and up past where the line left the road and went across fields is this:-
Where the line crossed the Wisbech Canal, as was, it approached, each way, by a very obvious gradient, which would tax the little engines , especially in rain and snow.
There are very few"hills" like this in Fenland.

Apart from the very changed Yardmaster's house at Upwell Terminus, now a Health Centre, car park and old peoples' housing, there is nothing else.  Certainly nothing at Wisbech, where a housing estate has covered the entire station site.

And so, this is all that remains of the Reverend W. Awdry's muse, for this is the line from whence came Toby the Tram Engine and all his chums, including the unfairly more popular Thomas, et al.
Oddly, the line may have skirted the parish of Emneth, but never saw the village, in which Awdry lived and was Rector.